Search This Blog

Showing posts with label Crochet for children. Show all posts

Free Crochet Pattern- Sensory Toy Balls #2 | Cherry and Crochet Designs

 Sensory Toy Balls- Waves, Crossed, Textured, Circles

These sensory toy balls are a perfect gift for a baby or child. They work up really quickly and can be made using tiny scraps of yarn. They contain a filler pouch rather than regular stuffing for extra safety for the child, and feature a crossed version, a circle version, a wavy version, a textured version and many more in the previous post. The whole set would make a great quick and easy last minute present for an expectant mother or toddler. 


For all of the sensory balls in the series, you will need these items

Filler pouch (instructions for how to make here)
Double knitting yarn in colour(s) of your choice
4mm crochet hook
Yarn needle to weave in ends

Waves Toy Sensory Ball (medium blue)

Chain 2

R1) 8 half double crochet in 2nd chain from hook, slip stitch to first stitch. 

R2) Chain 1, 2 half double crochet in each stitch, slip stitch to first stitch. 

R3) Chain 1, *2 half double crochet in stitch, 1 half double crochet in next stitch, repeat from * around, slip stitch to first stitch. 

R4-6) Chain 1, half double crochet in each stitch, slip stitch to first stitch

R7) Chain 1, "skip stitch, 5 half double crochet in post of stitch below, slip stitch to next stitch, chain 1," repeat from " to " around. 

Insert filler pouch here

R8) Chain 1, *half double crochet two together in next 2 stitches, half double crochet in next stitch, repeat from * around, slip stitch to first stitch. 

R9) Chain 1, half double crochet 2 together around, slip stitch to first stitch

R10) Chain 1, half double crochet 2 together around, slip stitch to first stitch. 

Fasten off and sew top and bottom of ball closed, then weave in ends. 

Crossed Toy Sensory Ball (bright green)

Chain 2 with colour A

R1) 8 half double crochet in 2nd chain from hook, slip stitch to first stitch. 

R2) Chain 1, 2 half double crochet in each stitch, slip stitch to first stitch. Change to colour B. 

R3) Chain 1, *2 half double crochet in stitch, 1 half double crochet in next stitch, repeat from * around, slip stitch to first stitch. 

R4-5) Chain 2, double crochet in each stitch, slip stitch to first stitch. 

Insert filler pouch here

Do the round 5 crosses now- 

Round 5 Crosses- Chain 4, slip stitch to base of 4th stitch of round 5, *chain 4 again and slip stitch to top of 3rd stitch from the current stitch, chain 4, slip stitch to base of stitch 4 stitches away* repeat from * to * until the end. 

R6) Chain 1, *half double crochet two together in next 2 stitches, half double crochet in next stitch, repeat from * around, slip stitch to first stitch. Change to colour D. 

R7) Chain 1, half double crochet 2 together around, slip stitch to first stitch

R8) Chain 1, half double crochet 2 together around, slip stitch to first stitch. 

Round 4 crosses- fasten on yarn at beginning of round 4. Chain 4, slip stitch to top of 4th stitch of round 4 (this should be the same stitch as the first chain of the round 5 crosses) ,*chain 4 again and slip stitch to base of 3rd stitch from the current stitch, chain 4, slip stitch to top of stitch 4 stitches away*. Repeat from * to *, the slip stitches should line up from round 5 crosses and round 4 so they form crosses. 

Fasten off and sew top and bottom of ball closed, then weave in ends. 

Textured Toy Sensory Ball (red)

Chain 2

R1) 8 half double crochet in 2nd chain from hook, slip stitch to first stitch. 

R2) Chain 1, 2 half double crochet in each stitch, slip stitch to first stitch. 

R3) Chain 1, *2 half double crochet in stitch, 1 half double crochet in next stitch, repeat from * around, slip stitch to first stitch. 

R4-6) Chain 1, half double crochet in each stitch, slip stitch to first stitch

Insert filler pouch here

Texture) *Chain 5, slip stitch to post of stitch from round 3 directly below current stitch, chain 5, slip stitch to stitch from round 6 1 stitch away from previous stitch* repeat from * to *

R7) (Work in round 6, not the chains) Chain 1, *half double crochet two together in next 2 stitches, half double crochet in next stitch, repeat from * around, slip stitch to first stitch. 

R8) Chain 1, half double crochet 2 together around, slip stitch to first stitch

R9) Chain 1, half double crochet 2 together around, slip stitch to first stitch. 

Fasten off and sew top and bottom of ball closed, then weave in ends. 


Circles Toy Sensory Ball (gold)

Circle- make 10 half double crochet into post of stitch,

Chain 2

R1) 8 half double crochet in 2nd chain from hook, slip stitch to first stitch. 

R2) Chain 1, 2 half double crochet in each stitch, slip stitch to first stitch. 

R3) Chain 1, *2 half double crochet in stitch, 1 half double crochet in next stitch, repeat from * around, slip stitch to first stitch. 

R4) Chain 2, double crochet in each stitch, slip stitch to first stitch. 

R5) Chain 2, "circle, double crochet in 3 stitches," repeat from " to ", then *circle, double crochet in final 2 stitches* in last 3 stitches, slip stitch to first stitch. 

Insert filler pouch here

R7) Chain 1, *half double crochet two together in next 2 stitches, half double crochet in next stitch, repeat from * around, slip stitch to first stitch. 

R8) Chain 1, half double crochet 2 together around, slip stitch to first stitch

R9) Chain 1, half double crochet 2 together around, slip stitch to first stitch. 

Fasten off and sew top and bottom of ball closed, then weave in ends.

Thank you for reading Cherry and Crochet Designs, please comment if you have any issues or ideas for future patterns. 

Free Crochet Pattern- Sensory Toy Balls #1 | Cherry and Crochet Designs

 Sensory Toy Balls- Plain, Striped, Ridged, Bobble

These sensory toy balls are a perfect gift for a baby or child. They work up really quickly and can be made using tiny scraps of yarn. They contain a filler pouch rather than regular stuffing for extra safety for the child, and feature a striped version, a simple sparkly version, a bobbly version and many more in another post. The whole set would make a great quick and easy last minute present for an expectant mother or toddler. 


For all of the sensory balls in the series, you will need these items

Filler pouch (instructions for how to make here)
Double knitting yarn in colour(s) of your choice
4mm crochet hook
Yarn needle to weave in ends

Basic Toy Sensory Ball (sparkly black)

I used Stylecraft Cabaret in Shadows to make it sparkly. 

Chain 2

R1) 8 half double crochet in 2nd chain from hook, slip stitch to first stitch. 

R2) Chain 1, 2 half double crochet in each stitch, slip stitch to first stitch. 

R3) Chain 1, *2 half double crochet in stitch, 1 half double crochet in next stitch, repeat from * around, slip stitch to first stitch. 

R4-6) Chain 1, half double crochet in each stitch, slip stitch to first stitch

Insert filler pouch here

R7) Chain 1, *half double crochet two together in next 2 stitches, half double crochet in next stitch, repeat from * around, slip stitch to first stitch. 

R8) Chain 1, half double crochet 2 together around, slip stitch to first stitch

R9) Chain 1, half double crochet 2 together around, slip stitch to first stitch. 

Fasten off and sew top and bottom of ball closed, then weave in ends. 


Striped Toy Sensory Ball (mixed colours)

Chain 2 with colour A

R1) 8 half double crochet in 2nd chain from hook, slip stitch to first stitch. 

R2) Chain 1, 2 half double crochet in each stitch, slip stitch to first stitch. Change to colour B. 

R3) Chain 1, *2 half double crochet in stitch, 1 half double crochet in next stitch, repeat from * around, slip stitch to first stitch. 

R4-6) Chain 1, half double crochet in each stitch, slip stitch to first stitch. Change to colour C at end of round 5. 

Insert filler pouch here

R7) Chain 1, *half double crochet two together in next 2 stitches, half double crochet in next stitch, repeat from * around, slip stitch to first stitch. Change to colour D. 

R8) Chain 1, half double crochet 2 together around, slip stitch to first stitch

R9) Chain 1, half double crochet 2 together around, slip stitch to first stitch. 

Fasten off and sew top and bottom of ball closed, then weave in ends. 


Ridged Toy Sensory Ball (orange)

Chain 2

R1) 8 half double crochet in 2nd chain from hook, slip stitch to first stitch. 

R2) Chain 1, 2 half double crochet in each stitch, slip stitch to first stitch. 

R3) Chain 1, *2 half double crochet in stitch, 1 half double crochet in next stitch, repeat from * around, slip stitch to first stitch. 

R4) Chain 2, double crochet in each stitch, slip stitch to first stitch. 

R5) Chain 2,"front post double crochet, back post double crochet," repeat from "to" around, slip stitch to first stitch. 

Insert filler pouch here

R7) Chain 1, *half double crochet two together in next 2 stitches, half double crochet in next stitch, repeat from * around, slip stitch to first stitch. 

R8) Chain 1, half double crochet 2 together around, slip stitch to first stitch

R9) Chain 1, half double crochet 2 together around, slip stitch to first stitch. 

Fasten off and sew top and bottom of ball closed, then weave in ends. 


Bobble Toy Sensory Ball

Bobble- make 5 double crochet, take hook out of loop and reinsert at top of first double crochet, insert end of hook into loop of 5th stitch and make a slip stitch.

Chain 2

R1) 8 half double crochet in 2nd chain from hook, slip stitch to first stitch. 

R2) Chain 1, 2 half double crochet in each stitch, slip stitch to first stitch. 

R3) Chain 1, *2 half double crochet in stitch, 1 half double crochet in next stitch, repeat from * around, slip stitch to first stitch. 

R4) Chain 1, half double crochet in 2 stitches, *bobble, half double crochet in 5 stitches, repeat from * around , slip stitch to first stitch. 

R5) Chain 1, half double crochet in 6 stitches, *bobble, half double crochet in 5 stitches, repeat from * around , slip stitch to first stitch. 

R6) Chain 1, half double crochet in 3 stitches, *bobble, half double crochet in 5 stitches, repeat from * around , slip stitch to first stitch. 

Insert filler pouch here

R7) Chain 1, *half double crochet two together in next 2 stitches, half double crochet in next stitch, repeat from * around, slip stitch to first stitch. 

R8) Chain 1, half double crochet 2 together around, slip stitch to first stitch

R9) Chain 1, half double crochet 2 together around, slip stitch to first stitch. 

Fasten off and sew top and bottom of ball closed, then weave in ends.

Thank you for reading Cherry and Crochet Designs, please comment if you have any issues or ideas for future patterns. 

Free Crochet Pattern- Super Easy Cube Lovey | Cherry and Crochet Designs

 Super Easy Cube Lovey

This quirky children's toy is super easy to make and also works up quickly, making it rewarding to make and to give. It could be personalised with letters, appliques or faces on the sides of the cube, as well as simply different colours for each square made. It would make a great last minute gift, especially if it were personalised for the child. The pattern itself is very easy, using only basic single crochet and double crochet stitches and no abbreviations are used, only full terms, making it accessible for beginners. It could easily be your first toy project. 


You will need
5mm crochet hook
Double knitting yarn in colours of your choice
Fiberfill or shredded fabric for the stuffing of the cube 
Yarn needle

Cube Lovey

Faces of cube (make 6)
Chain 11
Row 1) Single crochet in 2nd chain from hook, single crochet in each remaining chain
Row 2-10) Chain 1, single crochet in each stitch. 
At end of row 10, fasten off, leaving a long tail for sewing. 
Sew the six squares into a cube by making a basket shape, then stuffing it and sewing the remaining square on the top. 

Squares for lovey (make 4)
Chain 3
Round 1) 2 double crochet in 3rd chain from hook, "chain 2, 3 double crochet in same stitch again" repeat from " to " twice more to create a square. Slip stitch to top of turning chain. 
Round 2) Chain 2,"3 double crochet, chain 2, 3 double crochet in next 3 corner chains, then "3 double crochet, chain 2, 2 double crochet, slip stitch to top of turning chain" in same corner as turning chain. 
Round 3) Chain 2, 2 double crochet in same chain space as chain 2, then "3 double crochet in each non-corner chain space and *3 double crochet, 2 chain, 3 double crochet* in each corner chain" Slip stitch to first stitch

If you want your lovey to look like the one in the picture, change colour now to the colour of the block you are using. 

Round 4) Chain 2, 3 double crochet in next chain space, then "3 double crochet in each non-corner chain space and *3 double crochet, 2 chain, 3 double crochet* in each corner chain", "3 double crochet, chain 2, 2 double crochet, slip stitch to top of turning chain" in same space as turning chain. Fasten off. 
Sew together the four squares using a yarn needle and a length of yarn. 

Assembly
Sew the cube onto the middle of the squares using two strands of yarn at once, and make multiple stitches for security. Strongly pull the cube away from the squares, if it doesn't pull away from the squares, it is secure enough. Please be very careful, especially if making for a child. 
Weave in any remaining ends 

Thank you for visiting Cherry and Crochet Designs, please comment if you need any help. 

Free Crochet Pattern- Frisbee for children or animals | Cherry and Crochet Designs

 Crochet Frisbee


This quick and easy toy is suitable as a gift for both pets and children, although supervise pets for safety. This fun and practical toy can be made in around 20 minutes, depending on how quickly you crochet, and can be made in any double knitting yarn. If it were stripey, you could use up tiny scraps of yarn and create a unique toy for your children. It may require blocking by putting under a pile of heavy books for a few days, to ensure it is flat enough for a frisbee. Making it with two strands of yarn would also help to make it a little easier to throw. 

You will need

Double knitting yarn in colour of your choice
5mm crochet hook
Yarn needle to weave in ends

Frisbee
Chain 3
Round 1) 14 double crochet in 3rd chain from hook, slip stitch to first stitch
Round 2) Chain 2, 2 double crochet in each stitch, slip stitch to first stitch. 
Round 3) Chain 2, "2 double crochet in stitch, 1 double crochet in next stitch, repeat from " around. Slip stitch to first stitch.  
Round 4)Chain 2, "2 double crochet in stitch, 1 double crochet in next 2 stitches, repeat from " around. Slip stitch to first stitch.  
Round 5) Chain 2, "2 double crochet in stitch, 1 double crochet in next 3 stitches, repeat from " around. Slip stitch to first stitch.  
Round 6) Chain 2, "2 double crochet in stitch, 1 double crochet in next 4 stitches, repeat from " around. Slip stitch to first stitch.  
Round 7) Chain 2, "2 double crochet in stitch, 1 double crochet in next 5 stitches, repeat from " around. Slip stitch to first stitch.  
Round 8) Chain 2, "2 double crochet in stitch, 1 double crochet in next 6 stitches, repeat from " around. Slip stitch to first stitch.  Fasten off and weave in ends securely. 

Thank you for visiting, please comment if you are unsure about anything and would like some help. 


Free Crochet Pattern- Stuffed Fish Toy | Cherry and Crochet Designs

Stuffed fish toy

This simple fish toy would be ideal for both children and pets (don't give it to pets that will eat it though!!) It requires less than 1 ball of yarn and can be made in under an hour, so it is a quick gift idea. There is the option of adding an eye by sewing a few stitches if you wish to make it more realistic. An ideal present for a fish lover, it is large enough for a baby to safely play with, (although it should be lined so the child doesn't get to the stuffing), and could equally be used to play fetch with a small dog. The pattern uses only full terms, no abbreviations, so it can be understood by beginners easily. Enjoy!


You will need

Pink double knitting yarn
4mm hook
Fiberfill for stuffing
Yarn needle for weaving in ends

Chain 3,
Round 1)12 double crochet in 3rd chain from hook, slip stitch to first stitch
Round 2) Chain 2, 2 double crochet in each stitch, slip stitch to first stitch
Round 3) Chain 2, *double crochet in stitch, 2 double crochet in next stitch, repeat from * around, slip stitch to first stitch
Round 4) Chain 2, double crochet in each stitch, slip stitch to first stitch
Round 5) Chain 2, *double crochet in next 2 stitches, 2 double crochet in next stitch, repeat from * around, slip stitch to first stitch
Round 6) Chain 2, *double crochet in next 3 stitches, 2 double crochet in next stitch, repeat from * around, slip stitch to first stitch
Round 7) Chain 2, *double crochet in next 4 stitches, 2 double crochet in next stitch, repeat from * around, slip stitch to first stitch
Round 8) Chain 2, working in back loops only, double crochet in each stitch, slip stitch to first stitch.
Round 9-13) Chain 2, double crochet in each stitch, slip stitch to first stitch
Round 14) Chain 2, *double crochet in next 2 stitches, double crochet 2 together in next 2 stitches, repeat from * around, slip stitch to first stitch
Round 15) Chain 2, *double crochet in one stitch, double crochet 2 together in next 2 stitches, repeat from * around, slip stitch to first stitch
Round 16) Chain 2, 2 double crochet in each stitch, slip stitch to first stitch
Round 17) Chain 2, *double crochet in stitch, 2 double crochet in next stitch, repeat from * around, slip stitch to first stitch
Round 18-19) Chain 2, double crochet in each stitch, slip stitch to first stitch, do not fasten off.
Stuff toy lightly and then slip stitch across round 19 to close it, fasten off and weave in ends

If you wish to have eyes, use a short length of black yarn and make several stitches around the width of 2 double crochets. Weave in ends. 

Thank you for reading, please let me know if you have any issues. 
Stay safe!

Free Crochet Pattern- Pretty in Pinks Baby Beanie | Cherry and Crochet Designs

I partake in affiliate programs and therefore I may make a small commission if you purchase through links, at no extra cost to you.
Pretty in Pinks Baby Beanie by Cherry and Crochet Designs


This baby hat is sized for newborns and can be created in under an hour. With pink shell stripes, this adorable baby beanie is an ideal gift for a newborn baby and is very easy to create. It requires only a small amount of yarn, meaning you can use up scraps and create a beautiful present. It would also make an ideal project to make and sell or give as a present at a baby shower.

You will need
Yarn needle
4.5 MM Crochet hook
Stylecraft Special DK in Candy Floss, Fiesta and White

Difficulty- Easy-intermediate
Size- To fit newborn

Pretty in Pinks Beanie
With White chain 3,
Round 1) 15 double crochet in 3rd chain from hook, slip stitch to first stitch.
Round 2) Chain 2, 2 double crochet in each stitch, slip stitch to first stitch.
Round 3) Chain 2, “2 double crochet, double crochet in next stitch”, repeat around, slip stitch to first stitch. Change to Candy Floss in last stitch.
Round 4) Chain 1, “4 single crochet in stitch, skip stitch, slip stitch in next stitch”, repeat around, slip stitch to first stitch.
Round 5) Chain 3, “single crochet in middle of next 4 single crochet, chain 2” repeat around, slip stitch to first stitch. Change to Fiesta in last stitch
Round 6) Chain 1, “4 single crochet in stitch, skip stitch, slip stitch in next stitch”, repeat around, slip stitch to first stitch. Change to White in last stitch.
Round 7) Repeat round 5, do not change colour at end of round.
Round 8) Chain 2, double crochet in each stitch, slip stitch to first stitch.
Round 9-13) Repeat round 4-8
Round 14) Chain 2, double crochet in each stitch, slip stitch to first stitch. Fasten off and weave in ends.

If you are enjoying looking through my blog, please consider supporting me by purchasing from my Ravelry store. If you use the code CherryandCrochetDesignsBlog, you get 50% off! I donate 10% of my revenue to the National Trust, a conservation charity. By financially supporting me, you allow me to devote more time to writing patterns and sharing them on this blog for everyone. Thank you!!!

Please comment if you have any issues or ideas for future posts.

Free Crochet Pattern- Emoji Lovey/Comforter | Cherry and Crochet Designs

I partake in affiliate programs and therefore I may make a small commission if you purchase through links, at no extra cost to you.
Crochet Emoji Doll Lovey by Cherry and Crochet Designs

This funky lovey/comforter is quick, easy and rewarding to make. The pattern is easy to follow as I don’t use any abbreviations, only the full terms. It is also designed with babies in mind, so it is securely attached and doesn’t have any loose parts, such as buttons. It would make a perfect gift that is a little different and out there. You definitely can’t buy a handmade crochet emoji doll lovey from the shops, so make something special for your child. Loveys/comforters are used as a soothing, comforting toy that they can use to comfort themselves. This makes them perfect for babies who are crying throughout the night. I hope you enjoy making this unique baby toy!

You will need
4 MM and 5MM Crochet hook
Stylecraft Special DK in Sunshine and Black
Yarn Needle
Stitch Marker
Scissors

Difficulty- Easy

Pattern
Face (make 2)
With 4MM and Sunshine, chain 2
R1) 6 single crochet in 2nd chain from hook, slip stitch into first stitch
R2) Chain 1, 2 single crochet in each stitch
R3) Chain 1, “single crochet in 1 stitch, 2 single crochet in next stitch”, repeat from “to”, slip stitch to first stitch.
R4) Chain 1, “single crochet in 2 stitches, 2 single crochet in next stitch”, repeat from “to”, slip stitch to first stitch.
R5) Chain 1, “single crochet in 3 stitches, 2 single crochet in next stitch”, repeat from “to”, slip stitch to first stitch.
R6) Chain 1, “single crochet in 4 stitches, 2 single crochet in next stitch”, repeat from “to”, slip stitch to first stitch.
R7) Chain 1, “single crochet in 5 stitches, 2 single crochet in next stitch”, repeat from “to”, slip stitch to first stitch.
R8) Chain 1, “single crochet in 6 stitches, 2 single crochet in next stitch”, repeat from “to”, slip stitch to first stitch. Fasten off and weave in ends for first, leave a long tail for second.

Mouth
With Black and 4MM, chain 3
R1) 6 double crochet in 3rd chain from hook
R2) Chain 2, 2 double crochet in each stitch
R3) Chain 2, “double crochet in 1 stitch, 2 double crochet in next stitch”. Fasten off and sew onto face as in picture using tail/

Eyes (make 2)
With Black and 4MM, chain 2
5 single crochet in 2nd chain from hook, slip stitch into first stitch. Fasten off and sew onto face as in picture using tail.

Blanket
Attach crochet hook to last stitch of face and fasten on black using 5MM. Chain 3
R1) 2 double crochet, “chain 2, 3 double crochet”, repeat 3 times and slip stitch to first stitch

If you are enjoying looking through my blog, please consider supporting me by purchasing from my Ravelry store. If you use the code CherryandCrochetDesignsBlog, you get 50% off! I donate 10% of my revenue to the National Trust, a conservation charity. By financially supporting me, you allow me to devote more time to writing patterns and sharing them on this blog for everyone. Thank you!!!

Please comment if you have any issues or ideas for future projects

Free Crochet Pattern- Strawberry Baby Beanie | Cherry and Crochet Designs

I partake in affiliate programs and therefore I may make a small commission if you purchase through links, at no extra cost to you.
Strawberry Baby Beanie 

This baby hat is sized for newborns and can be created in under an hour. With a green leafy ‘topping’ and white ‘seeds’ on a red background, this strawberry themed baby beanie is an ideal gift for a newborn baby and is very easy to create. It requires only a small amount of yarn, meaning you can use up scraps and create a beautiful present. It would also make an ideal project to make and sell, which is allowed as long as you give clear credit to my pattern and Cherry and Crochet Designs.

You will need
Yarn needle
4.5 MM Crochet hook
Stylecraft Special DK in Meadow, Matador and Lemon

Difficulty- Easy-intermediate
Size- 12cm x 10cm (To fit newborn)

Bobble- Work double crochet, leaving two loops on the hook at the end, then work another 2 unfinished double crochet into the same stitch, pull through all loops on hook on last stitch.

Pattern
With Meadow, chain 3,
Round 1) 15 double crochet in 3rd chain from hook, slip stitch to first stitch. (15)
Round 2) Chain 2, 2 double crochet in each stitch, slip stitch to first stitch. (30)
Round 3) Chain 2, “2 double crochet, double crochet in next stitch” repeat around, slip stitch to first stitch. Change to Matador in last stitch. (45)
Round 4) Chain 2, double crochet in each stitch, slip stitch to first stitch. (45)
Round 5) Chain 2, double crochet in 2 stitches, “bobble using Lemon, double crochet in 4 stitches”, repeat from “to” around. With Matador, double crochet in the remaining stitches at the end of the round, then slip stitch to first stitch
Round 6) Chain 2, double crochet in 5 stitches, “bobble using Lemon, double crochet in 4 stitches”, repeat from “to” around. With Matador, double crochet in the remaining stitches at the end of the round, then slip stitch to first stitch
Round 7-9) Repeat rounds 5 and 6.
Round 10) Chain 2, double crochet in each stitch, slip stitch to first stitch. Fasten off and weave in ends (45)

Leafy Top

With Meadow, chain 2
Round 1) 6 single crochet in 2nd chain from hook, slip stitch to 1st stitch
Round 2) Chain 2, double crochet in same stitch as turning chain, “chain 3, 2 double crochet” in each stitch, don’t slip stitch to 1st stitch.
Round 3)”single crochet, 5 double crochet, chain 3, 5 double crochet” in each chain 3 space. Slip stitch to 1st stitch and fasten off, leaving a long tail for sewing.

Sew to top of hat and weave in ends.

If you are enjoying looking through my blog, please consider supporting me by purchasing from my Ravelry store. If you use the code CherryandCrochetDesignsBlog, you get 50% off! I donate 10% of my revenue to the National Trust, a conservation charity. By financially supporting me, you allow me to devote more time to writing patterns and sharing them on this blog for everyone. Thank you!!!

Please comment if you have any issues or ideas for future projects

Free Crochet Pattern- 18" Doll Hat, Scarf and Coat Set | Free Crochet Pattern

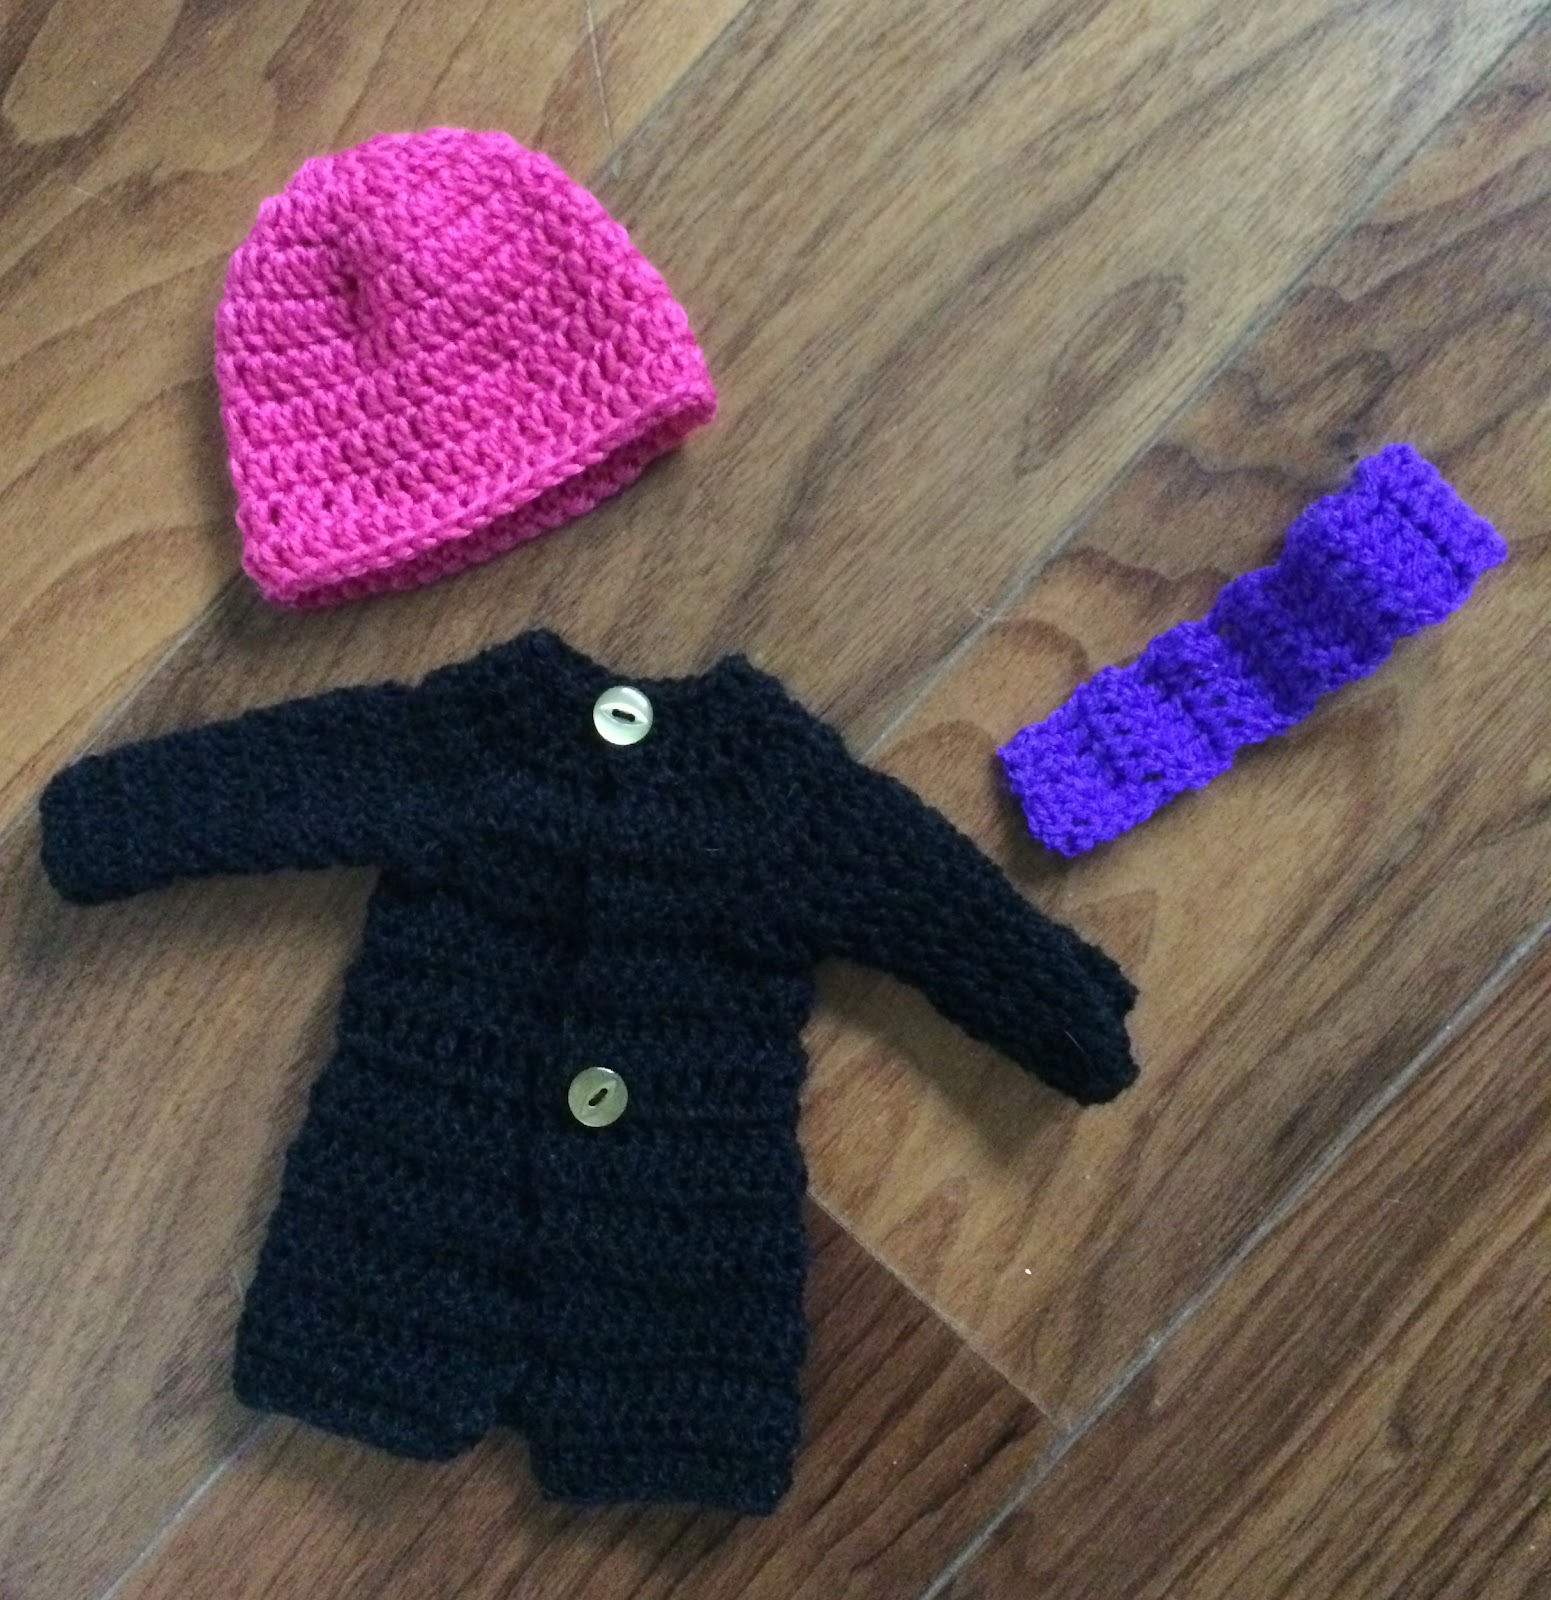
18 inch Doll Winterwear/ Outerwear Set 
Made to fit an 18 inch doll, such as American Girl, Our Generation, Designafriend or Journey Girl, this set includes a black buttoned coat, a pink beanie hat and a purple scarf. This outerwear set is a quick, beginner-friendly project, that makes a perfect gift for a child with a doll, perhaps alongside other doll clothing pieces from my Ravelry store or blog. It is both easy, quick and fun to make. The set can be finished in around an hour.

You will need
Yarn needle
4.5 MM Crochet hook
2 small buttons (omit for babies)
Stylecraft Special DK in Raspberry, Violet and Black

Difficulty- Easy-intermediate
Size- To fit 18 inch doll, such as American Girl doll, Designafriend, Our Generation

Pattern
Coat
With Black, chain 50
Row 1) Double crochet in 3rd chain from hook, double crochet in each stitch
Row 2-8) Chain 2, double crochet in each stitch
Row 9) Chain 2, *double crochet in 5 stitches, double crochet two together, repeat from *
Row 10) Chain 3, treble crochet in each stitch
Row 11-14) Chain 2, double crochet in each stitch
Row 15) Chain 2, double crochet in 7 stitches, chain 12, skip 6 stitches, double crochet in 14 stitches, chain 12, skip 6 stitches, double crochet in 7 stitches.
Row 16) Chain 2, double crochet in each stitch.
Row 17)Chain 2, *double crochet in 2 stitches, double crochet two together, repeat from *
Row 18) Chain 2, *double crochet in 1 stitch, double crochet two together, repeat from *
Row 19) Chain 2, double crochet in each stitch. 

Sleeves
Fasten yarn on corner of sleeve hole. 
Round 1) Chain 2, double crochet in each stitch, make one stitch into the side of the double crochets.
Round 2-9) Chain 2, double crochet in each stitch, slip stitch to first stitch. Repeat for other sleeve.
Sew buttons on row 1 and row 10. Fasten off and weave in ends.

Scarf
With Violet, chain 3
Row 1) Double crochet in 3rd chain from hook, double crochet in each stitch
Row 2-30) Chain 2, double crochet in each stitch. Fasten off and weave in ends.

Hat
With Raspberry, chain 3
Round 1) 12 double crochet in 3rd chain from hook, slip stitch to first stitch
Round 2) Chain 2, 2 double crochet in each stitch, slip stitch to first stitch.
Round 3) Chain 2, *double crochet in 1 stitch, 2 double crochet in next stitch* repeat around
Round 4-9) Chain 2, double crochet in each stitch, slip stitch to first stitch. Fasten off and weave in ends.

If you are enjoying looking through my blog, please consider supporting me by purchasing from my Ravelry store. If you use the code CherryandCrochetDesignsBlog, you get 50% off! I donate 10% of my revenue to the National Trust, a conservation charity. By financially supporting me, you allow me to devote more time to writing patterns and sharing them on this blog for everyone. Thank you!!!

Thank you for visiting Cherry and Crochet Designs. Please comment to let me know what you think of this pattern. 

Free Crochet Pattern- 18" Doll School/Work Outfit | Cherry and Crochet Designs


18 inch Doll School/Work Outfit 

Made to fit an 18 inch doll, such as American Girl, Our Generation, Designafriend or Journey Girl, this set includes a white blouse, black skirt, black slip on shoes and pink jumper. This school/work wear set is a quick, beginner-friendly project, that makes a perfect gift for a child with a doll, perhaps alongside other doll clothing pieces from my Ravelry store or blog. It is both easy, quick and fun to make. The set can be finished in around an hour.

You will need
Yarn needle
4.5 MM Crochet hook
1 small white button (omit for babies)
Stylecraft Special DK in Shrimp, White and Black

Difficulty- Easy-intermediate
Size- To fit 18 inch doll, such as American Girl doll, Designafriend, Our Generation

Pattern
Skirt
With Black, chain 44, join to first chain with slip stitch
Round 1) Chain 2, double crochet in each chain, slip stitch to first stitch.
Round 2) Chain 2, *double crochet in 2 stitches, 2 double crochet in next stitch, repeat from* around. Slip stitch to first stitch.
Round 3-10) Chain 2, double crochet in each stitch, slip stitch to first stitch. Fasten off and weave in ends.

Blouse
With White, chain 48, join to first chain with slip stitch.
Round 1-6) Chain 2, double crochet in each stitch, slip stitch to first stitch.
Row 7) Chain 2, double crochet in 7 stitches, chain 12, skip 6 stitches, double crochet in 21 stitches, chain 12, skip 6 stitches, double crochet in 8 stitches. Row 8-9) Chain 2, double crochet in each stitch.
Row 10) Chain 2, *double crochet in 2 stitches, double crochet 2 together in next stitch. Repeat from * around.
Row 11) Chain 2, * double crochet in 1 stitch, double crochet 2 together in next stitch, repeat from * around.
Row 12) Chain 2, double crochet in each stitch. Fasten off and weave in ends. Sew button on top of blouse.

Jumper
With Shrimp, chain 50, slip stitch to first chain.
Round 1-6) Chain 2, double crochet in each stitch, slip stitch to first stitch.
Round 7) Chain 2, double crochet in 10 stitches, chain 12, skip 6 stitches, double crochet in 21 stitches, chain 12, skip 6 stitches, double crochet in 10 stitches, slip stitch to first stitch.
Round 8) Chain 2, double crochet in each stitch, slip stitch to first stitch.
Round 9) Chain 2, *double crochet in 2 stitches, double crochet 2 together in next stitch. Repeat from * around, slip stitch to first stitch.
Round 10) Chain 2, * double crochet in 1 stitch, double crochet 2 together in next stitch, repeat from * around, slip stitch to first stitch. Fasten off and weave in ends.
Fasten on at corner of sleeve.
Round 1) Chain 2, double crochet in each stitch, double crocheting once in the side of double crochet stitches. Slip stitch to first stitch.
Round 2-5) Chain 2, double crochet in each stitch, slip stitch to first stitch. Fasten off and repeat for other sleeve. Weave in ends.


Shoes (Make 2)
Chain 14
Round 1) Double crochet in 3rd stitch from hook and each chain after. 6 double crochet in end chain, then double crochet on the bottom of each chain, therefore creating an oval. Slip stitch to first stitch.
Round 2) Chain 2, double crochet in front loop only, slip stitch to first stitch.
Round 3) Chain 2, double crochet in each stitch, slip stitch to first stitch.
Round 4) Chain 2, double crochet in 4 stitches. Fasten off, leaving a tail for sewing. Whipstitch the tab to the other side of the shoe and the toe. Weave in ends.

If you are enjoying looking through my blog, please consider supporting me by purchasing from my Ravelry store. If you use the code CherryandCrochetDesignsBlog, you get 50% off! I donate 10% of my revenue to the National Trust, a conservation charity. By financially supporting me, you allow me to devote more time to writing patterns and sharing them on this blog for everyone. Thank you!!!


Free Crochet Pattern- Pink and Purple Baby Beanie | Cherry and Crochet Designs

I partake in affiliate programs and therefore I may make a small commission if you purchase through links, at no extra cost to you.
Pink and Purple Baby Beanie by Cherry and Crochet Designs

This baby hat is sized for newborns and can be created in under an hour. With pink and purple striped ‘v’s, this adorable baby beanie is an ideal gift for a newborn baby and is very easy to create. It requires only a small amount of yarn, meaning you can use up scraps and create a beautiful present. It would also make an ideal project to make and sell or give as a present at a baby shower.

You will need
Yarn needle
4.5 MM Crochet hook
Stylecraft Special DK in Lemon, Plum and Fondant

Difficulty- Easy-intermediate
Size- To fit newborn

Pattern
With Lemon chain 3,
Round 1) 15 double crochet in 3rd chain from hook, slip stitch to first stitch.
Round 2) Chain 2, “double crochet, chain 1, double crochet” in each stitch, slip stitch to first stitch.
Round 3) Chain 2, *“double crochet, chain 1, double crochet” in chain 1 space, then in between V’s, then in next chain 1 space*, repeat from *to* around, slip stitch to first stitch. Change to Fondant in last stitch.
Round 4-9) Chain 2, “double crochet, chain 1, double crochet” in each chain 1 space, slip stitch to first stitch. Change to Lemon in last stitch of round 4, to Plum in last stitch of round 5, to Lemon in last stitch of round 6, to Fondant in last stitch of round 7, to Lemon in last stitch of round 8.
Round 5-9) Chain 2, 2 double crochet in each gap between clusters, slip stitch to first stitch.
Round 10) Chain 2, double crochet in each stitch, slip stitch to first stitch. Fasten off and weave in ends.

If you are enjoying looking through my blog, please consider supporting me by purchasing from my Ravelry store. If you use the code CherryandCrochetDesignsBlog, you get 50% off! I donate 10% of my revenue to the National Trust, a conservation charity. By financially supporting me, you allow me to devote more time to writing patterns and sharing them on this blog for everyone. Thank you!!!

Please comment if you have any ideas for future patterns or issues.

Free Crochet Pattern- 18" Doll Victorian Outfit | Free Crochet Pattern

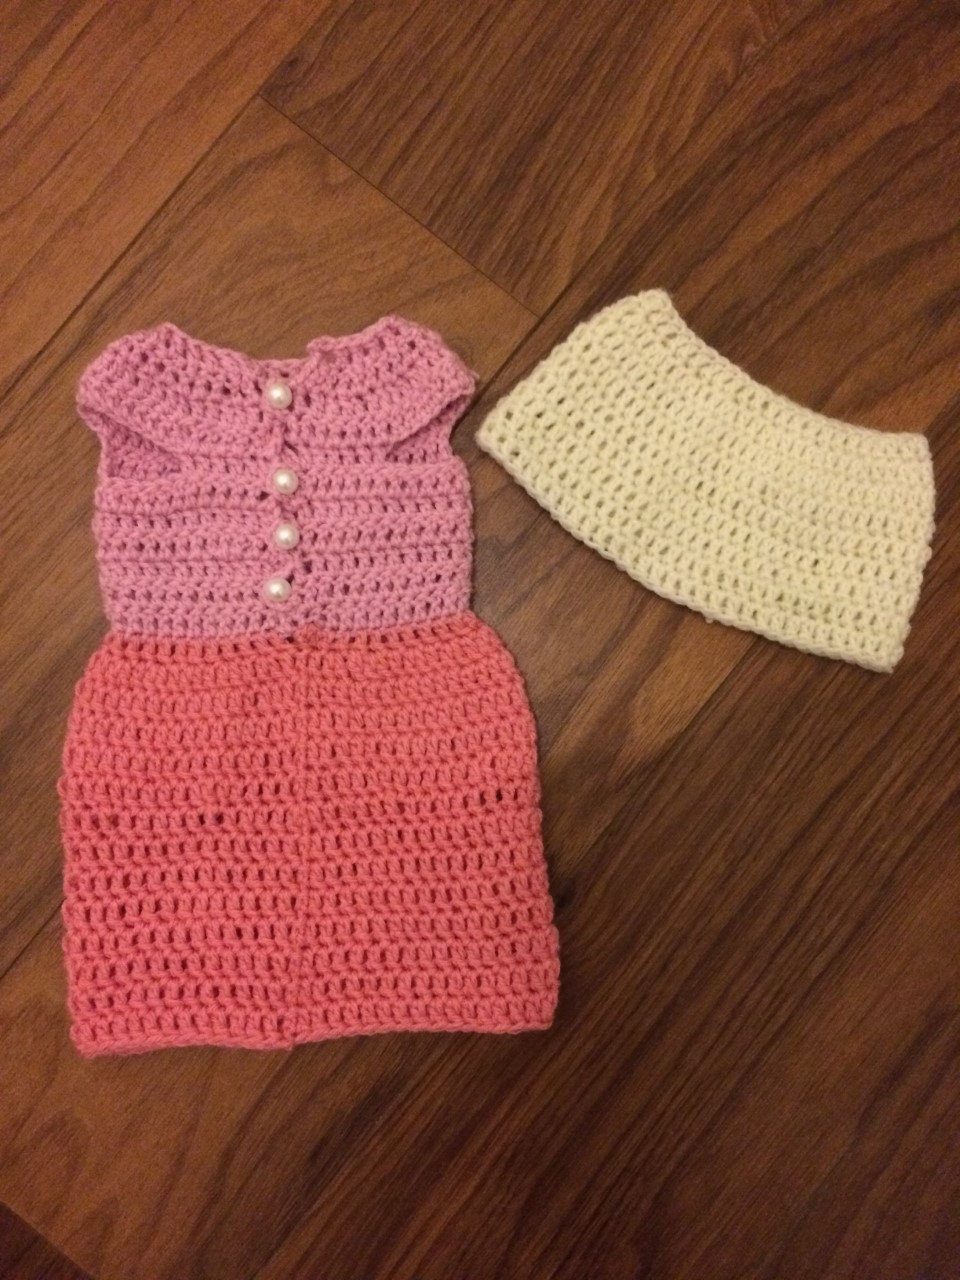
18 inch Doll Victorian Outfit by Cherry and Crochet Designs

Made to fit an 18" doll, such as American Girl, Our Generation, Designafriend or Journey Girl, this old fashioned dress and shawl set is a quick, beginner-friendly project, that makes a perfect gift for a child with a doll, perhaps alongside other doll clothing pieces from my Ravelry store or blog. This pattern includes the pattern for a Victorian/Edwardian dress and a cream shawl. It is both easy, quick and fun to make. The set can be finished in around an hour.

You will need
Yarn needle
4.5 MM Crochet hook
4 small pearl shaped buttons (omit for babies)
Stylecraft Special DK in Shrimp, Cream and Fondant

Difficulty- Easy-intermediate
Size- To fit 18 inch doll, such as American Girl doll, Designafriend, Our Generation

Pattern
Dress
With Fondant, chain 49, join to first chain with slip stitch
Round 1) Chain 2, double crochet in each chain, slip stitch to first stitch.
Row 2-6) Chain 2, double crochet in each stitch, don’t join to first stitch.
Row 7) Chain 2, double crochet in 6 stitches, chain 12, skip 6 stitches, double crochet in 25 stitches, chain 12, skip 6 stitches, double crochet in 6 stitches.
Row 8-9) Chain 2, double crochet in each stitch or chain. n off and weave in ends.
Row 10) Chain 2, *double crochet in 2 stitches, double crochet 2 together. Repeat from * around.
Row 11) Chain 2, *double crochet in 1 stitch, double crochet 2 together. Repeat from * around.
At the end of the row, single crochet in the side of row 11 and 10, *then chain 5, skip a row, single crochet in the side of 2 rows* repeat this until the bottom round.
Chain 5 and slip stitch to the first round. Fasten off and weave in ends. Sew the 4 buttons on opposite the button loops.

Skirt of dress
With Shrimp, attach the yarn to the first stitch of round 1 of the dress.
Round 1) Chain 2, double crochet in the bottom of each stitch. Slip stitch to first stitch
Round 2) Chain 2, *double crochet in 1 stitch, 2 double crochet in next stitch. Repeat from * around. Slip stitch to first stitch.
Round 3-6) Chain 2, double crochet in each stitch, slip stitch to first stitch.
Round 7) Chain 2, *double crochet in 5 stitches, double crochet 2 together in next stitch. Repeat from * around. Slip stitch to first stitch.
Round 8-14) Chain 2, double crochet in each stitch. Slip stitch to first stitch. Fasten off and weave in ends.

Shawl
With Cream, chain 46, join to first chain with a slip stitch
Round 1) Chain 2, double crochet in each chain, slip stitch to first stitch.
Round 2) Chain 2, *double crochet in 2 stitches, 2 double crochet in next stitch, repeat from * around, slip stitch to first stitch.
Round 3-9) Chain 2, double crochet in each stitch, slip stitch to first stitch. Fasten off and weave in ends.

If you are enjoying looking through my blog, please consider supporting me by purchasing from my Ravelry store. If you use the code CherryandCrochetDesignsBlog, you get 50% off! I donate 10% of my revenue to the National Trust, a conservation charity. By financially supporting me, you allow me to devote more time to writing patterns and sharing them on this blog for everyone. Thank you!!!

Thank you for visiting Cherry and Crochet Designs. Please comment to let me know what you think of this pattern, would you like more doll clothing patterns?

Free Crochet Pattern- Lion Baby Beanie | Cherry and Crochet Designs

Lion Baby Beanie by Cherry and Crochet Designs
I partake in affiliate programs and therefore I may make a small commission if you purchase through links, at no extra cost to you.
This baby hat is sized for newborns and can be created in under an hour. With a cheeky lion  face, this baby beanie is an ideal gift for a newborn baby and is very easy to create. It requires only a small amount of yarn, meaning you can use up scraps and create a beautiful present. Deceivingly easy, it would also make an ideal project to make and sell or give as a present at a baby shower.

You will need
Yarn needle
4.5 MM Crochet hook
Stylecraft Special DK in Citron, Jaffa, Black and Stone

Difficulty- Easy
Size- 12cm x 10cm (To fit newborn)

Pattern

Bobble- Work double crochet, leaving two loops on the hook at the end, then work another 7 unfinished double crochet into the same stitch, pull through all loops on hook on last stitch.

With Citron , chain 3,
Round 1) 15 double crochet in 3rd chain from hook, slip stitch to first stitch. (15)
Round 2) Chain 2, 2 double crochet in each stitch, slip stitch to first stitch. (30)
Round 3) Chain 2, “2 double crochet, double crochet in next stitch” repeat around, slip stitch to first stitch. (45)
Round 4)Chain 2, double crochet in each stitch, slip stitch to first stitch. (45)
Round 5) Chain 2, double crochet in 10 stitches, bobble in Black,double crochet in 10 stitches using Citron, bobble in Black, double crochet in each remaining stitch using Citron, slip stitch to first stitch. (45)
Round 6-10) Chain 2, double crochet in each stitch, slip stitch to first stitch. (45).
Fasten off and weave in ends.

Mouth
With Citron , chain 5,
Round 1) double crochet in 3rd chain from hook, double crochet in each chain, 6 double crochet in end chain, double crochet in bottom of each chain, 6 double crochet in last stitch, slip stitch to first stitch. Fasten off, leaving a tail for sewing. Complete nose, then sew onto hat as pictured above.

Nose
With Stone, chain 2
Row 1) 2 single crochet in 2nd chain from hook
Row 2) Chain 2, 2 single crochet in each stitch.
Row 3) Chain 2, 2 single crochet in first stitch, single crochet in each stitch, 2 single crochet in last stitch. Fasten off, leaving a tail for sewing. Sew onto mouth as in picture above.

Mane
With Jaffa, chain 65
Row 1) Slip stitch to 3rd chain from hook, “chain 5, skip a stitch, slip stitch in next stitch”, repeat from “to”. Fasten off and sew onto hat using tail. Weave in ends.

Ears (Make 2)
With Citron, chain 2.
Row 1) Chain 1, 2 single crochet in stitch
Row 2) Chain 1, 2 single crochet in each stitch
Row 3-4) Chain 1, 2 single crochet in first stitch, single crochet in each stitch, 2 single crochet in last stitch.
Row 5) Chain 2, double crochet in each stitch. Chain 1, single crochet around ear. Fasten off, leaving a tail for sewing. Sew onto hat as pictured above. Weave in ends.

If you are enjoying looking through my blog, please consider supporting me by purchasing from my Ravelry store. If you use the code CherryandCrochetDesignsBlog, you get 50% off! I donate 10% of my revenue to the National Trust, a conservation charity. By financially supporting me, you allow me to devote more time to writing patterns and sharing them on this blog for everyone. Thank you!!!

Please comment if you have any issues or ideas for future patterns.

Free Crochet Pattern- Little Mouse Doll | Cherry and Crochet Designs

Little Mouse Doll
I partake in affiliate programs and therefore I may make a small commission if you purchase through links, at no extra cost to you.


This little mouse is a fun, easy project that can be made in around half an hour. It makes a perfect gift and is small enough to fit in the palm of your hand. This pattern, like most of my other patterns, is written in full terms, no abbreviations, making it a perfect first project for beginners. There are more animals in the "Little animals" collection.

You will need
Small amount of fiberfill
Black sewing thread
Yarn needle
3.5 MM Crochet hook
Stylecraft Special DK in Camel and a scrap of Fiesta

Difficulty- Easy
Size- 5.5cm x 3cm

Pattern

Body
Chain 2
1) 8 single crochet in 2nd chain from hook, slip stitch to 1st stitch
2) Chain 1, single crochet in same stitch, 2 single crochet in each stitch, slip stitch to 1st stitch
3-8) Chain 1, single crochet in each stitch, slip stitch to 1st stitch. At the end of round 8, stuff with fiberfill until you can’t get any more in.
9) Chain 1, single crochet 2 together in each stitch , slip stitch to first stitch.
10-11) Chain 1, “single crochet 2 together, single crochet”, repeat around, slip stitch to first stitch
12) Chain 1, single crochet 2 together in each stitch. Fasten off

Ears
With camel,
Chain 2, 3 single crochet in 2nd chain from hook. Fasten off and sew the bottom of the ears onto the body

Eyes
With black sewing thread, repeatedly sew a stitch 8 times in round 9, repeat again 2 stitches to the right.


Whiskers
Using the pictures as a guide, sew 3 stitches with black sewing thread making them join at a point, repeat again on the other side

Nose
With fiesta, stitch the gap in between the whiskers

Tail
Using the end from the body, thread a needle and poke it through the 8 single crochet from round 1

Weave in the ends by threading a yarn needle with the end and poking it into the body, so it is part of the stuffing.

If you are enjoying looking through my blog, please consider supporting me by purchasing from my Ravelry store. If you use the code CherryandCrochetDesignsBlog, you get 50% off! I donate 10% of my revenue to the National Trust, a conservation charity. By financially supporting me, you allow me to devote more time to writing patterns and sharing them on this blog for everyone. Thank you!!!

Please comment if you have any issues or ideas for future patterns. 

Free Crochet Pattern- Little Whale Doll | Cherry and Crochet Designs

Little Whale Doll
I partake in affiliate programs and therefore I may make a small commission if you purchase through links, at no extra cost to you.


This little whale is a fun, easy project that can be made in around half an hour. It makes a perfect gift and is small enough to fit in the palm of your hand. This pattern, like most of my other patterns, is written in full terms, no abbreviations, making it a perfect first project for beginners. There are also more animals in the "Little animals" collection, including a mouse, pig, chicken, dog, sheep and cat. 

You will need
Small amount of fiberfill
Black sewing thread
Yarn needle
3.5 MM Crochet hook
Stylecraft Special DK in bluebell

Difficulty- Easy
Size- 5.5cm x 3cm

Pattern
Body
Chain 2
1) 8 single crochet in 2nd chain from hook, slip stitch to 1st stitch
2) Chain 1, single crochet in same stitch, 2 single crochet in each stitch, slip stitch to 1st stitch
3-8) Chain 1, single crochet in each stitch, slip stitch to 1st stitch. At the end of round 8, stuff with fiberfill until you can’t get any more in.
9) Chain 1, single crochet 2 together in each stitch , slip stitch to first stitch.
10) Chain 1, “single crochet 2 together, single crochet”, repeat around, slip stitch to first stitch. Fasten off

Eyes
With black sewing thread, repeatedly sew a stitch 8 times in round 9, repeat again 2 stitches to the right.

Nose
With bluebell, repeatedly sew a stitch 6 times as shown in the picture.

Tail
Chain 3, 5 double crochet in 3rd chain from hook, chain 3, double crochet in next 2 chain. Fasten off. Sew the tail to the body, as shown in the picture.

Weave in the ends by threading a yarn needle with the end and poking it into the body, so it is part of the stuffing.

If you are enjoying looking through my blog, please consider supporting me by purchasing from my Ravelry store. If you use the code CherryandCrochetDesignsBlog, you get 50% off! I donate 10% of my revenue to the National Trust, a conservation charity. By financially supporting me, you allow me to devote more time to writing patterns and sharing them on this blog for everyone. Thank you!!!

Please comment if you have any issues or ideas. 

Free Crochet Pattern- Lacy Preemie Hat | Cherry and Crochet Designs

Lacy Preemie Beanie
I partake in affiliate programs and therefore I may make a small commission if you purchase through links, at no extra cost to you.

This baby hat is sized for preemies and can be created in under half an hour. With a cute little flower, this lattice-style baby beanie is an ideal gift for a premature baby and is very easy to create. It requires only a small amount of yarn, meaning you can use up scraps and create a beautiful present. It would also make an ideal project to make and sell or give as a baby shower gift.

You will need
4.5 MM Crochet hook
Yarn needle
Stylecraft Special DK in Sherbet and Fondant

Difficulty- Easy
Size- To fit preemie baby

Pattern
Bobble- Work double crochet, leaving two loops on the hook at the end, then work another 7 unfinished double crochet into the same stitch, pull through all loops on hook on last stitch.

Hat
With Sherbet, chain 3,
Round 1) 15 double crochet in 3rd chain from hook, slip stitch to first stitch.
Round 2) Chain 2, 2 double crochet in each stitch, slip stitch to first stitch.
Round 3) Chain 2, “2 double crochet, double crochet in next stitch” repeat around, slip stitch to first stitch.
Round 4-11) “Chain 5, skip 3 stitches, slip stitch in stitch”, repeat around, working in the round (working continuously). Fasten off and weave in ends.

Flower
With Fondant, chain 3
Round 1) “Bobble, chain 2, slip stitch”, in 3rd chain from hook 5 times. Fasten off and sew onto hat using tail.

Weave in ends.

If you are enjoying looking through my blog, please consider supporting me by purchasing from my Ravelry store. If you use the code CherryandCrochetDesignsBlog, you get 50% off! I donate 10% of my revenue to the National Trust, a conservation charity. By financially supporting me, you allow me to devote more time to writing patterns and sharing them on this blog for everyone. Thank you!!!

Please comment if you have any issues or ideas for future patterns

Free Crochet Cat Baby Beanie Pattern | Cherry and Crochet Designs


Cat Baby Beanie
I partake in affiliate programs and therefore I may make a small commission if you purchase through links, at no extra cost to you.
This baby hat is sized for newborns and can be created in around an hour. With a kitten/cat face, this baby beanie is an ideal gift for a newborn baby and is very easy to create. It requires only a small amount of yarn, meaning you can use up scraps and create a beautiful present for a baby shower or newborn baby. Deceivingly easy, it would also make an ideal project to make and sell.

You will need
Yarn needle
4.5 MM Crochet hook
Stylecraft Special DK in Parchment, Black, Aster and Saffron

Difficulty- Easy
Size- 12cm x 10cm (To fit newborn)

Pattern
Bobble- Work double crochet, leaving two loops on the hook at the end, then work another 3 unfinished double crochet into the same stitch, pull through all loops on hook on last stitch.

Hat
With Parchment, chain 3,
Round 1) 15 double crochet in 3rd chain from hook, slip stitch to first stitch. (15)
Round 2) Chain 2, 2 double crochet in each stitch, slip stitch to first stitch. (30)
Round 3) Chain 2, “2 double crochet, double crochet in next stitch” repeat around, slip stitch to first stitch. (45)
Round 4)Chain 2, double crochet in each stitch, slip stitch to first stitch. (45)
Round 5) Chain 2, double crochet in 10 stitches, bobble in Black,double crochet in 10 stitches using Parchment, bobble in Black, double crochet in each remaining stitch using Parchment, slip stitch to first stitch. (45)
Round 6-9) Chain 2, double crochet in each stitch, slip stitch to first stitch. Change to Matador in last stitch (45)
Round 10) Chain 2, (in back loops only), double crochet in each stitch, slip stitch to first stitch. (45)
Fasten off and weave in ends.

Mouth
With Parchment , chain 6,
Round 1) 6 double crochet in 3rd chain from hook, double crochet in each chain, 6 double crochet in end chain, double crochet in each, slip stitch to first stitch.
Round 2) Chain 2, double crochet in each stitch, slip stitch to first stitch. Fasten off, leaving a tail for sewing. Complete nose, then sew onto hat as pictured above.

Nose
With Black, chain 2
Row 1) 2 single crochet in 2nd chain from hook
Row 2) Chain 2, 2 single crochet in each stitch.
Row 3) Chain 2, 2 single crochet in first stitch, single crochet in each stitch, 2 single crochet in last stitch. Fasten off, leaving a tail for sewing. Sew onto mouth as in picture above.

Whiskers
Thread yarn needle with black, then embroider two large stitches from the nose outwards. Repeat on other side, then weave in ends.

Ears (Make 2)
With Parchment, chain 2
Row 1) Single crochet in 2nd chain from hook.
Row 2) Chain 1, 2 single crochet in stitch
Row 3) Chain 1, 2 single crochet in each stitch
Row 4-5) Chain 1, 2 single crochet in first stitch, single crochet in each stitch, 2 single crochet in last stitch.
Row 6) Chain 2, double crochet in each stitch. Fasten off, leaving a tail for sewing. Sew onto hat as pictured above.

ID Tag
With Saffron, chain 3, 12 double crochet in 3rd chain from hook, slip stitch to 1st stitch. Fasten off, leaving a tail, and sew in the middle of blue ‘collar’ like in picture above.

Weave in ends.

If you are enjoying looking through my blog, please consider supporting me by purchasing from my Ravelry store. If you use the code CherryandCrochetDesignsBlog, you get 50% off! I donate 10% of my revenue to the National Trust, a conservation charity. By financially supporting me, you allow me to devote more time to writing patterns and sharing them on this blog for everyone. Thank you!!!

Please comment if you have any ideas or issues.

Free Crochet Pattern- Simple Doll | Cherry and Crochet Designs

Simple Doll by Cherry and Crochet

I partake in affiliate programs and therefore I may make a small commission if you purchase through links, at no extra cost to you.
This doll is a quick and easy doll that is perfect for beginners or as a gift. She can be made in under an hour, and the full terms are used, no abbreviations. This doll is a great first project, to practise key skills such as colour changing, single crochet, double crochet and whipstitch, or sewing. Once created, she makes a delightful gift, and there will soon be modifications for this doll such as clothes and accessories.

You will need
Small amount of fiberfill
Black sewing thread
Yarn needle
4 MM Crochet hook
Stylecraft Special DK in Lemon- A, Fondant -B, Black-C, Walnut-D,

Difficulty- Easy
Size- approximately 20cm x 7cm

Why not make this doll in ethical and eco friendly yarns from Darn Good Yarn?
New Subscribers get 15% OFF - Shop Now - DarnGoodYarn.com 

Pattern
With A, chain 23
Row 1) Single crochet in 2nd chain from hook, single crochet in each chain
Row 2-3) Chain 1, single crochet in each stitch, change to B in last stitch of row 3
Row 4-21) Chain 1, single crochet in each stitch, change to A in last stitch of row 21
Row 22-26) Chain 1, single crochet in each stitch
Row 27) Carrying C, chain 1, single crochet in the next 4 stitches, change to C, 4 double crochet into the next stitch, change back to A, 1 single crochet in the next st, change to C, 4 double crochet in the next stitch, change back to A, single crochet in each stitch to end
Row 28) Chain 1, single crochet in each stitch, change to D in last stitch (when you get to the 4 double crochet, chain 1 and slip stitch into the next single crochet)
Row 29-33) Chain 1, single crochet in each stitch
Row 34) Chain 12, 3 single crochet in each chain, slip stitch to base of stitch, single crochet in the next 9 stitches, chain 12, 3 single crochet in each chain, slip stitch to base of stitch, single crochet in each stitch to end. Fasten off and leave a long end for sewing.

Assembly
Sew the side of the doll closed, with A, along the bottom and across the top, then stuff well.

Weave in all ends

If you are enjoying looking through my blog, please consider supporting me by purchasing from my Ravelry store. If you use the code CherryandCrochetDesignsBlog, you get 50% off! I donate 10% of my revenue to the National Trust, a conservation charity. By financially supporting me, you allow me to devote more time to writing patterns and sharing them on this blog for everyone. Thank you!!!

Please comment if you have any ideas or suggestions for future projects.

Free Crochet Pattern- 18 Inch Doll Sleepwear Set | Cherry and Crochet Designs

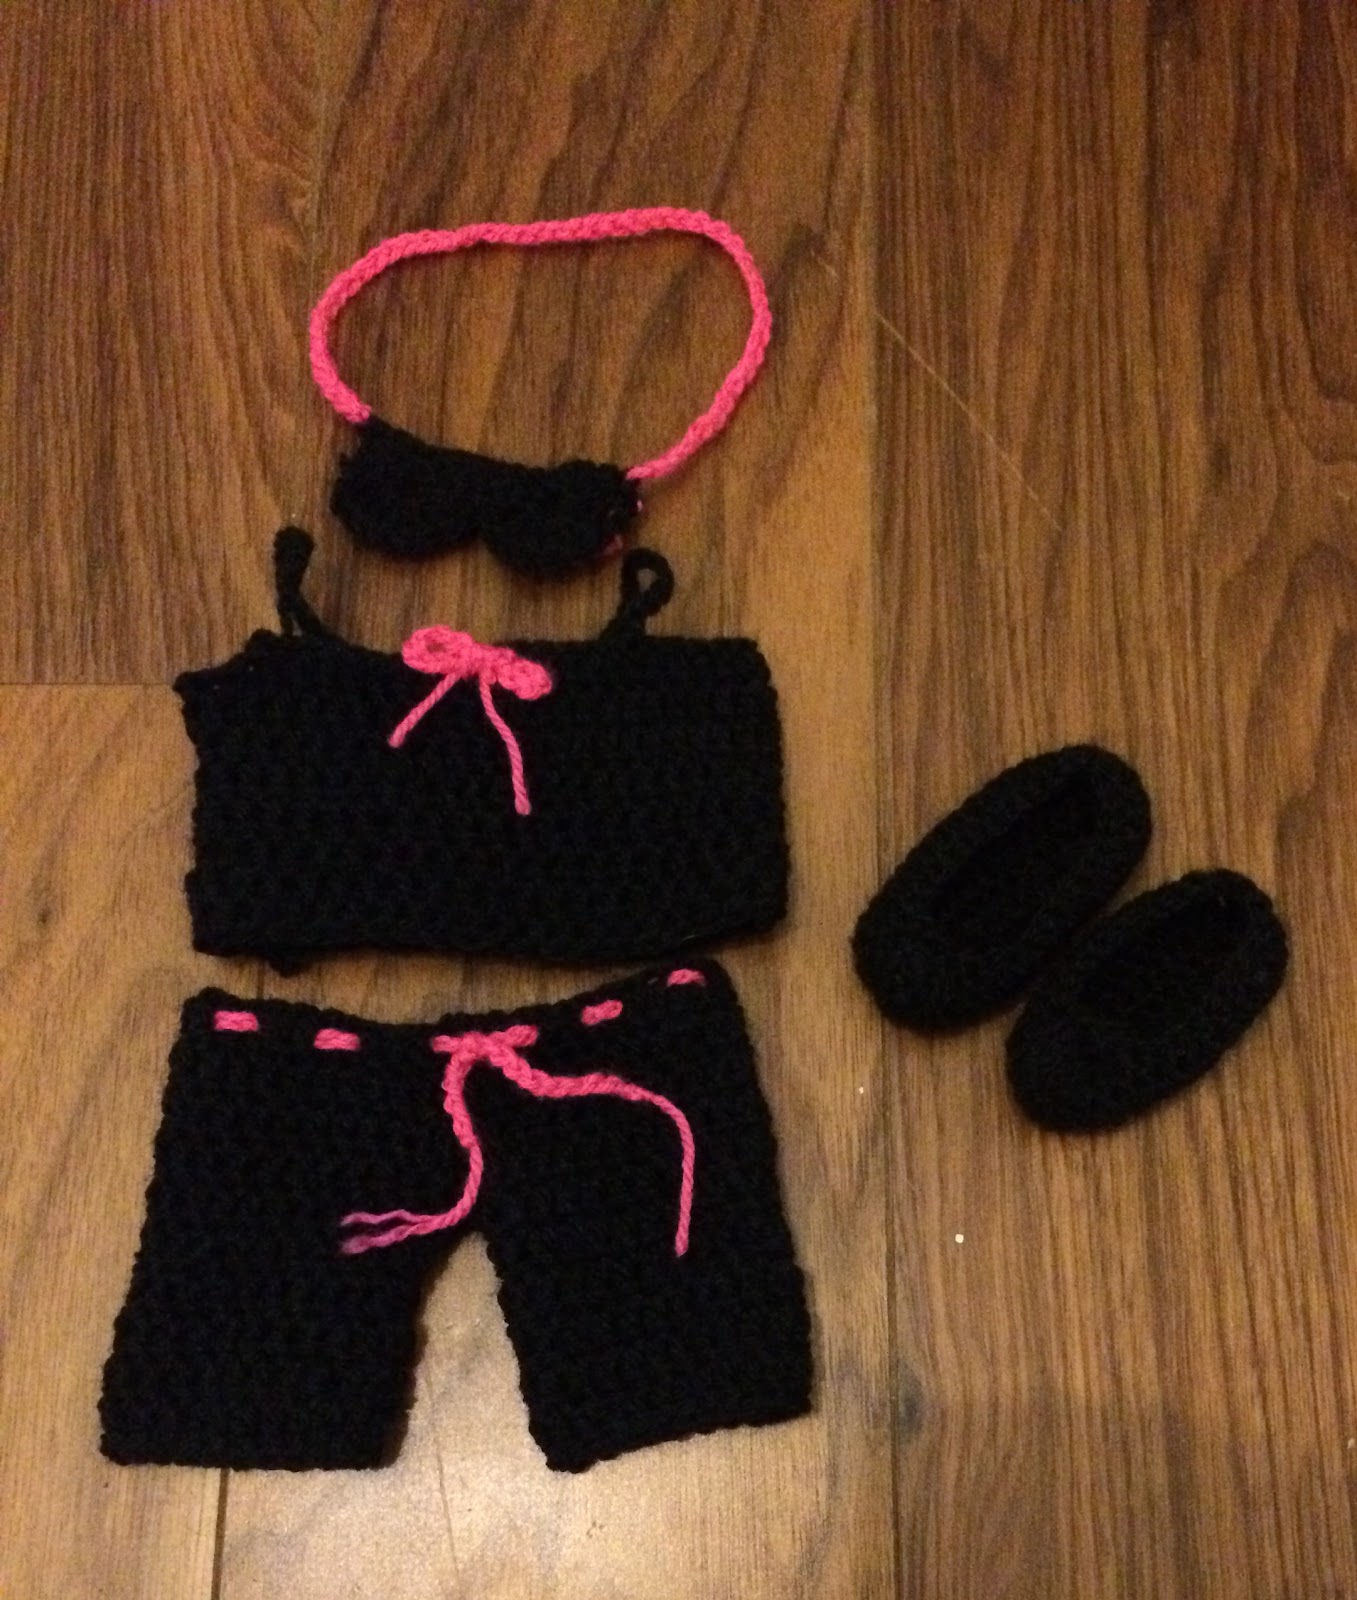
18 inch Doll Sleepwear Outfit
I partake in affiliate programs and therefore I may make a small commission if you purchase through links, at no extra cost to you.
Made to fit an 18 inch doll, such as American Girl, Our Generation, Designafriend or Journey Girl, this doll sleepwear set is a quick, beginner-friendly project, that makes a perfect gift for a child with a doll, perhaps alongside other doll clothing pieces from my blog or Ravelry store. This pattern includes the pattern for pyjama shorts, a pyjama camisole/vest top, a pair of plain slippers and an eye mask. It is both easy, quick and fun to make. The set can be finished in around an hour.


You will need
Yarn needle
4.5 MM Crochet hook
Stylecraft Special DK in Black and a small amount of Fiesta

Difficulty- Easy-intermediate
Size- To fit 18 inch doll, such as American Girl doll, Designafriend, Our Generation

Pattern
Shorts
With Black, chain 48, join to first chain with slip stitch
Round 1-3) Chain 2, double crochet in each stitch, slip stitch to first stitch
Round 4) Chain 2, double crochet in 22 stitches, slip stitch to first stitch of round.
Round 5-11) Chain 2, double crochet in each stitch, slip stitch to first stitch. Fasten off.
Fasten on next to first leg and repeat round 4-11. Fasten off and weave in ends.
Drawstring for waist- With Fiesta, chain 60. Fasten off and, using a yarn needle, weave it into the first round, tie in front of shorts.

Pajama Top
Chain 47, join to first chain with slip stitch.
Round 1-4) Chain 2, double crochet in each stitch, slip stitch to first stitch.
Round 5)Chain 2, double crochet in 6 stitches, double crochet 2 together, repeat for a total of 6 times.
Round 6-8) Chain 2, double crochet in each stitch, slip stitch to first stitch. Fasten off and weave in ends. 


Straps- Fasten on yarn on 7th stitch in from left, when top is laid flat. Chain 15, then slip stitch to the stitch 14 stitches from the first stitch. Flip the top over and repeat. Weave in ends.

Bow- With Fiesta, chain 20. Fasten off, loop through two stitches in the middle of the top and tie into a bow.

Slipper (Make 2)
Chain 14
Round 1) Double crochet in 3rd stitch from hook and each chain after. 6 double crochet in end chain, then double crochet on the bottom of each chain, therefore creating an oval. Slip stitch to first stitch.
Round 2) Chain 2, double crochet in front loop only, slip stitch to first stitch.
Round 3) Chain 2, double crochet in each stitch, slip stitch to first stitch.
Round 4) Chain 2, double crochet in 4 stitches. Fasten off, leaving a tail for sewing. Whipstitch the tab to the other side of the slipper and the toe. Weave in ends.

Eye Mask
Chain 14,
Row 1) Double crochet in 3rd chain from hook, double crochet in each chain.
Row 2) “Chain 3, skip 2 stitches, 7 treble crochet, skip 2 stitches, slip stitch in next stitch”, repeat again. Fasten off and weave in ends. Fasten on with fiesta on last stitch of row 2, chain 45 and slip stitch to first stitch of row 2. Fasten off and weave in ends

An ad-free printable of this pattern is also available from my Ravelry store here

If you are enjoying looking through my blog, please consider supporting me by purchasing from my Ravelry store. If you use the code CherryandCrochetDesignsBlog, you get 50% off! I donate 10% of my revenue to the National Trust, a conservation charity. By financially supporting me, you allow me to devote more time to writing patterns and sharing them on this blog for everyone. Thank you!!!

Please comment if you have any problems or ideas for future patterns. 

Free Crochet Pattern- Little Cat Doll | Cherry and Crochet Designs


Little Cat Doll
I partake in affiliate programs and therefore I may make a small commission if you purchase through links, at no extra cost to you.
This little cat is a fun, easy project that can be made in around half an hour. It makes a perfect gift and is small enough to fit in the palm of your hand. This pattern, like most of my other patterns, is written in full terms, no abbreviations, making it a perfect first project for beginners. There are also more animals in the "little animals" collection, which are available here on this blog.


You will need
Small amount of fiberfill
Black sewing thread
Yarn needle
3.5 MM Crochet hook
Stylecraft Special DK in Jaffa and a scrap of Fondant

Difficulty- Easy
Size- 5.5cm x 3cm

Pattern

Body
Chain 2
1) 8 single crochet in 2nd chain from hook, slip stitch to 1st stitch
2) Chain 1, single crochet in same stitch, 2 single crochet in each stitch, slip stitch to 1st stitch
3-8) Chain 1, single crochet in each stitch, slip stitch to 1st stitch. At the end of round 8, stuff with fiberfill until you can’t get any more in.
9) Chain 1, single crochet 2 together in each stitch , slip stitch to first stitch.
10) Chain 1, “single crochet 2 together, single crochet”, repeat around, slip stitch to first stitch. Fasten off

Ears
Chain 2, double crochet, single crochet, double crochet, chain 1, single crochet. Whipstitch the base of the ears to the head like in the picture.

Eyes
With black sewing thread, repeatedly sew a stitch 8 times in round 9, repeat again 2 stitches to the right.

Whiskers
Using the pictures as a guide, sew 3 stitches with black sewing thread making them join at a point, repeat again on the other side

Nose
With fondant, stitch the gap in between the whiskers

Tail
Chain 11, “double crochet, single crochet, half double crochet,” single crochet in each ch. Whipstitch to bottom of body and weave in ends.

Weave in the ends by threading a yarn needle with the end and poking it into the body, so it is part of the stuffing.

If you are enjoying looking through my blog, please consider supporting me by purchasing from my Ravelry store. If you use the code CherryandCrochetDesignsBlog, you get 50% off! I donate 10% of my revenue to the National Trust, a conservation charity. By financially supporting me, you allow me to devote more time to writing patterns and sharing them on this blog for everyone. Thank you!!!

Please comment if you have any issues or ideas for future projects