Search This Blog

How to Make Filler Pouches for Toy Balls and How to Make Recycled Toy Stuffing | Cherry and Crochet Designs

How to make filler pouches for toy balls and how to make recycled toy stuffing


Pouch for inside of toy ball

These are very important in toys for babies as they prevent the stuffing from coming out of the toy and also allow you to use different colour stuffings without it ruining the appearance of the toy.

Take square of fabric around 6 inches square (I used an old camisole so that I could recycle it) and sew three sides closed with a small running stitch. It doesn’t need to be neat, only secure so that no stuffing can come out. Turn inside out and stuff with stuffing or fabric scraps. Sew the final side closed and tie off securely. 


How to make recycled toy stuffing

Not the most glamorous looking bag, I know!
I rarely have to use polyfill, as I mostly use fabric scraps and yarn scraps to stuff children’s toys. I do this for two reasons. Firstly, it is cheaper, as polyfill is relatively expensive for something that isn’t visible in the end product. Secondly, it is more eco-friendly as it uses a waste resource to replace a product that would otherwise have to be manufactured and shipped to me. Therefore, I use as much recycled toy stuffing as possible, and even take old raggedy clothing from friends and family otherwise destined for the bin and shred it into my toy stuffing. 


So, how to actually make it. 

First of all, get old unusable fabric, (my fave is tatty underclothing such as clean camisoles and pyjamas). You could clean them then soak in boiling water for an hour or so if you want to. Once it is completely dry, lay the fabrics out on the floor and get a carrier bag for your stuffing once produced. 

Now is the fun part, shred them into lengths using scissors, but try to keep them flat on the floor. Then, cut them into tiny squares by cutting across the lengths. Gather all the stuffing up and put in the bag, then repeat the whole process for all your fabric. 


The other way to ‘make’ toy stuffing is by saving all tiny lengths of yarn and small fabric scraps, and putting them in the same bag to use for stuffing. I have never put yarn or fabric in the bin as I use all of it, anything that is exceptionally knotted and cannot be untangled is cut and put in the bag. Tiny bits of yarn go into the bag, projects that have been unravelled, then the last tiny piece becomes knotted and not worth untangling, goes into the bag. In this way, no yarn is wasted and I save money and produce less waste. 


Thank you for reading and please comment letting me know your best way of saving money and the environment while crafting.

Free Crochet Pattern- Strong and Durable Washcloth | Cherry and Crochet Designs

 Strong and Durable Washcloth 

This simple and long lasting washcloth is super simple, very quick and could easily be your first project. It is versatile, customisable and scrap busting. Making it in stripes is an even better way to use up scraps and make a functional, multipurpose and simple end product, which would be perfect for gifting, especially if paired with a luxury handcrafted soap. It is made using any two strands of double knitting yarn for extra scrubbiness and strength. The pattern itself uses only full terms, no abbreviations, making it even easier for beginners. 


You will need
5mm crochet hook
2 balls of double knitting yarn in fiber and colour of your choice.
Yarn needle for weaving in ends

Strong and long lasting washcloth
Chain 26
Row 1) Double crochet in 3rd chain from hook, double crochet in each remaining chain
Row 2-11) Chain 2, double crochet in each stitch
Row 12) Chain 2, double crochet in each stitch.(You can finish here if you would rather not do the edging)
Single crochet 2 stitches in the last stitch of row 12, then single crochet along the side of the square, placing 1 single crochet in the side of each single crochet. Single crochet 2 stitches in the last stitch of the side and then single crochet in the bottom of row 1. Single crochet 2 stitches in the corner and then single crochet 1 stitch in the side of each single crochet row along the side. Single crochet 1 stitch in the first stitch of row 12 and slip stitch to the first stitch of row 12. Fasten off and weave in ends. 

Thank you for reading, please comment if you need any help. 

Free Crochet Pattern- Throwable Dog Ball | Cherry and Crochet Designs

 Throwable Dog Ball

This toy is ideal for playing with an energetic small dog at the park. It has a long piece of braided crochet at the end of the ball that is securely attached as it is crocheted on, making it strong. This allows the owner to throw it without getting mucky hands. It is a simple and special gift idea for a pet owner and can be made quickly. 

You will need

4mm crochet hook
Double knitting yarn in colour of your choice
Securely stitched stuffed spherical shaped pouch for stuffing 
Yarn needle for weaving in ends

Made-for-fetch Dog Ball

Chain 3, 

Round 1) 15 double crochet in 3rd chain from hook, slip stitch to first stitch

Round 2) Chain 2, 2 double crochet in each stitch, slip stitch to first stitch

Round 3) Chain 2, "2 double crochet in stitch, 1 double crochet in next stitch, repeat from " around. Slip stitch to first stitch.  

Round 4-5) Chain 2, double crochet in each stitch, slip stitch to first stitch

Insert stuffed pouch. ( I would use an old sock and fill it approximately half way with old fabric scraps, then twist the top and push the top of the sock over the pouch, then sew it closed multiple times for safety. 

Round 6) Chain 2, "double crochet 2 together in next 2 stitches, 1 double crochet in next stitch, repeat from " around. Slip stitch to first stitch.  

Round 7) Chain 2, double crochet 2 together around, slip stitch to first stitch

Round 8) Chain 2, double crochet in 5 stitches, turn

Row 9-41) Chain 2, double crochet in each stitch, turn. Fasten off

Insert hook next to final stitch of round 8, secure yarn and repeat round 8- row 41. Repeat this again for three total lengths of crochet, do not fasten off on the final one. Braid them simply and slip stitch across the top of the braid. Fasten off and weave in ends. 

Please supervise your dog while they play with this and take it away from them if it becomes broken. 

Thank you for visiting Cherry and Crochet Designs, please comment if you have any issues. 

Free Crochet Pattern- Super Easy Cube Lovey | Cherry and Crochet Designs

 Super Easy Cube Lovey

This quirky children's toy is super easy to make and also works up quickly, making it rewarding to make and to give. It could be personalised with letters, appliques or faces on the sides of the cube, as well as simply different colours for each square made. It would make a great last minute gift, especially if it were personalised for the child. The pattern itself is very easy, using only basic single crochet and double crochet stitches and no abbreviations are used, only full terms, making it accessible for beginners. It could easily be your first toy project. 


You will need
5mm crochet hook
Double knitting yarn in colours of your choice
Fiberfill or shredded fabric for the stuffing of the cube 
Yarn needle

Cube Lovey

Faces of cube (make 6)
Chain 11
Row 1) Single crochet in 2nd chain from hook, single crochet in each remaining chain
Row 2-10) Chain 1, single crochet in each stitch. 
At end of row 10, fasten off, leaving a long tail for sewing. 
Sew the six squares into a cube by making a basket shape, then stuffing it and sewing the remaining square on the top. 

Squares for lovey (make 4)
Chain 3
Round 1) 2 double crochet in 3rd chain from hook, "chain 2, 3 double crochet in same stitch again" repeat from " to " twice more to create a square. Slip stitch to top of turning chain. 
Round 2) Chain 2,"3 double crochet, chain 2, 3 double crochet in next 3 corner chains, then "3 double crochet, chain 2, 2 double crochet, slip stitch to top of turning chain" in same corner as turning chain. 
Round 3) Chain 2, 2 double crochet in same chain space as chain 2, then "3 double crochet in each non-corner chain space and *3 double crochet, 2 chain, 3 double crochet* in each corner chain" Slip stitch to first stitch

If you want your lovey to look like the one in the picture, change colour now to the colour of the block you are using. 

Round 4) Chain 2, 3 double crochet in next chain space, then "3 double crochet in each non-corner chain space and *3 double crochet, 2 chain, 3 double crochet* in each corner chain", "3 double crochet, chain 2, 2 double crochet, slip stitch to top of turning chain" in same space as turning chain. Fasten off. 
Sew together the four squares using a yarn needle and a length of yarn. 

Assembly
Sew the cube onto the middle of the squares using two strands of yarn at once, and make multiple stitches for security. Strongly pull the cube away from the squares, if it doesn't pull away from the squares, it is secure enough. Please be very careful, especially if making for a child. 
Weave in any remaining ends 

Thank you for visiting Cherry and Crochet Designs, please comment if you need any help. 

Free Crochet Pattern- Frisbee for children or animals | Cherry and Crochet Designs

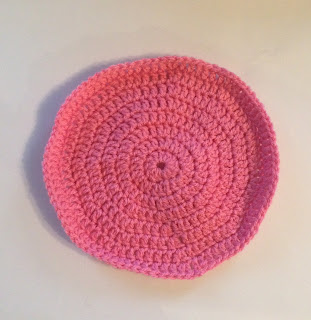
 Crochet Frisbee


This quick and easy toy is suitable as a gift for both pets and children, although supervise pets for safety. This fun and practical toy can be made in around 20 minutes, depending on how quickly you crochet, and can be made in any double knitting yarn. If it were stripey, you could use up tiny scraps of yarn and create a unique toy for your children. It may require blocking by putting under a pile of heavy books for a few days, to ensure it is flat enough for a frisbee. Making it with two strands of yarn would also help to make it a little easier to throw. 

You will need

Double knitting yarn in colour of your choice
5mm crochet hook
Yarn needle to weave in ends

Frisbee
Chain 3
Round 1) 14 double crochet in 3rd chain from hook, slip stitch to first stitch
Round 2) Chain 2, 2 double crochet in each stitch, slip stitch to first stitch. 
Round 3) Chain 2, "2 double crochet in stitch, 1 double crochet in next stitch, repeat from " around. Slip stitch to first stitch.  
Round 4)Chain 2, "2 double crochet in stitch, 1 double crochet in next 2 stitches, repeat from " around. Slip stitch to first stitch.  
Round 5) Chain 2, "2 double crochet in stitch, 1 double crochet in next 3 stitches, repeat from " around. Slip stitch to first stitch.  
Round 6) Chain 2, "2 double crochet in stitch, 1 double crochet in next 4 stitches, repeat from " around. Slip stitch to first stitch.  
Round 7) Chain 2, "2 double crochet in stitch, 1 double crochet in next 5 stitches, repeat from " around. Slip stitch to first stitch.  
Round 8) Chain 2, "2 double crochet in stitch, 1 double crochet in next 6 stitches, repeat from " around. Slip stitch to first stitch.  Fasten off and weave in ends securely. 

Thank you for visiting, please comment if you are unsure about anything and would like some help.